I wear cotton gloves whenever I am handling slides, negatives or photos. I bought them at an archival supply but I don't remember which one. I only scan on a flatbed, never with a scanner that has a feeder and I place my originals on the glass as carefully as possible, never sliding them around. I make two scans of each image, each in a different file format and I'm going to share my thought process about this with you to hopefully help you decide what process would work best for you.
In the various genealogy groups that I belong to on Facebook, I have seen some debate between TIFF and JPEG files and which is the best way to save digital scans. JPEG files are compressed each time you edit the file, so some digital information is lost each time. Some say this is no big deal and point to the larger file size of the TIFF file as a serious drawback, but I would rather do everything I can to ensure that my images will survive as far into the future as possible with as little data loss as possible. That being said, if I want to share my images, TIFF files can be a problem with some programs, such as Blogger, and are usually too large to email. TIFF files can always be converted to JPEGs when needed; Photoshop and Photoshop Elements can do it, the photo editor on my Mac can do it and I understand that there are free websites and software available online that can do it. I prefer just to scan my images twice from the get-go and have them available in both formats when I need them or want to share them.
When I scan my images the first time, I use:
- the automatic color restoration
- the dust removal tool
- sharpen the image
- save it as a JPEG at 300 dpi
- without color restoration
- without image sharpening
- but still with the dust removal
- I save that image as a TIFF file at 600 dpi
So this is what it looks like on-screen.
First I have to tell the scanner what kind of original I am scanning (red arrow) and then I can get a preview (blue arrow).

Then I'll see the images and I can start making adjustments. First I correct orientation (red), then choose an output size which is generally 4 x 6 for slides (green) and resolution (blue) , then sharpen (purple), color restore (pink) and remove the dust (yellow). Psst, when using the dust removal tool on your scanner, you won't see dust disappear in the preview scan. The tool works with the light somehow so that can't be previewed. Just because you can't see it here doesn't mean it isn't working!

Once I have done that, I choose Scan, which will bring me to this screen where I will choose the folder to which the scans will be saved (purple), the prefix for the file names (green), and the file type (pink). I'll share a bit about my file naming and organization in a post on Friday.

So, once I have done all this and scanned the images twice as I outlined earlier, I get output like so:

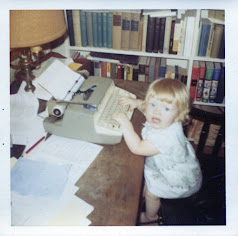
This is an auto color-restored image in .jpg format at 300 dpi with auto sharpening and dust removal. Although I'm usually very happy with the colors in the auto color-restored images, these slides that had a pink cast to them at the beginning, didn't turn out as well. For my purposes, I'll probably leave them as they are, but if I really wanted to play with the colors, I could still do that with photo editing software.
So, I have a Treasure Chest Thursday post ready to go for tomorrow, and I will wrap up this little scanning series on Friday with a post about my file organization and naming.
Maybe you've mentioned it before and I missed it or forgot, but what scanner do you have?
ReplyDeleteI have an Epson V370.
Delete